Monday, May 16, 2011
Bib Apron
This was one of the easiest projects I've worked on in a while. And I loved the outcome!
I found the post about the "Bapron" on U-create. If you still haven't been to their website then you need to go... right now..! That site is a wealth of knowledge and different skill level.
Here is the actual tutorial on how to make the bib aprons. I made the aprons for a fundraiser for our Young Women so they could raise money for Girl's camp. I'm not sure what the they actual went for, but any donations totally helped that night.
I made mine so they could be a set.
A set for a boy,
and a set for a girl. I'll admit when I showed my husband the first one I made and it was a girl's color I saw fear in his eyes. I think he thought I was going to announce something to him. Luckily for him I just like making girly stuff and wanted to make the girl bibs first.
If you've taken a look a the tutorial welcome back :). I pretty much followed her instructions and pattern to a "T". I made my bias tape to be the 1.5" size. It was perfect and so so easy. And I am 100% a fan of making bias tape now. I love that you can make it to match whatever you are working on. Goodbye buying bias tape!
Here is a view of the back of the bapron.
And if you think that the Bapron is only for babies you're wrong. Zack had to try on one of the baprons too. So here is a picture of my 3 year old and my 1 year old sporting the bapron. Such good models. Oh and trying to get them both to look at the camera... impossible!
Saturday, April 23, 2011
Project Easter Skirt - Fail
Basically I just wasted $19.00 in material. Grrr! It's not salvageable because not all the measurements are off.
Also I am having a huge issue with my sewing machine sewing ZigZag Stiches. You can see from this picture what it's doing. To get around this I just used a straight stitch when I sewed the ruffle to the skirt.
The most frustating part of it all is I thought it was going to be easy to work on so I started this first instead of working on the boys ties and now it's the day before Easter and I don't have an Easter skirt and the boys don't have Easter ties.
I'm frustrated with myself and lack of sewing ability. I keep thinking it's a learned process but I honest think some people are just born with the ability to creat thing with a sewing machine (like my mom) and I just don't.
Monday, April 18, 2011
Easter Peep Bunnies
Well this next craft isn't hard or stale... LOL.
Check out the blog Dandelions and Lace for this next tutorial. I'm not even going to show how I made them (other then a few tips) because her explanation and pictures are amazing!
The first difference in my Peeps and hers is that I enlarged her pattern. The reason I did this was because
a) I'm just a beginner and I don't think I could have sewn around the ears as well as she did... It was still tricky.
b) I wanted to use my peeps as decorations where hers were small enough to put in a Easter Basket.
Here are my Easter Peeps:
And now my tips.
If the back of the fleece isn't noticeable like 2 of my fabric's were make sure to mark them somehow so you know which way is the front and which is the back. The pattern looks symmetrical but it's not. I had this problem with the first one that I made. I had the second piece all pinned to complete the back and none of the corners or ears matched up. It would have made for a silly looking bunny.
When pinning together the back of the bunny. If found it easier to match key corners (top of each ear, anywhere there was to be an indent). It took away any guess work that I had to do.
Use a ton of pins! It helps keep it all together and makes sure the fabric won't bunch up or stretch the wrong direction.
Have fun with the colors and where you display the bunnies. My son loves getting up in the morning and seeing where the bunnies have moved to that day. The funniest thing he said one morning while eating breakfast and saw that two of the bunnies were on a ledge we have in our living room "Oh my crap mom, what are they doing up there?!" He's only two so it was pretty funny because I don't know where he learned "Oh my crap" from.
Thursday, April 14, 2011
St. Patrick Day Shirts
Supplies:
Tshirt
Fabric of your choice
Sewable Heat Transfer
Coordinating thread
Fabric Paint (I just used Acrylic paint)
Freezer Paper
I bought their shirts at Target for $3.00.
Next I picked up some Green fabric from Walmart. It was pretty cheap I think I spent $0.27 for the little bit that I bought. I already had the heat transfer so I didn't need to buy that.
So pretty much each shirt costed me $3.27 to make.
First I found a four leaf clover on the web. I found this one:

I resized it to fit the shirts that I had bought. Gavin's four leaf clover was a little bit smaller then Zacks naturally.
I cut the fabric and the heat transfer to the size of the clover picture that I had printed.
I then ironed on the heat transfer as directed on the package. Remember to use the Sewable heat transfer if you are planning on sewing the shirts. I wanted them to last so I sewed my design on.
Next I pinned the clover to my fabric. And cut it out.
After the clover was cut out I peeled the paper off the heat transfer (as directed on the packaging) and ironed it to my shirt. Not sure if because it was sewable transfer paper or if I'd had it for a while, but the edges didn't stay down very well. The rest of it held in place so it was workable.
After I had the four leaf clover where I wanted it on the shirt I figured out how big I wanted my words. I'm not very creative so I just used the word LUCKY. I have the program Cricut DesignStudio on my computer (LOVE IT). By using the Design Studio I'm able to make my letters exactly how wide and long I want them to be. I can also move the letters so they are closer to further apart to each other. (So much I'm able to do with this program).
When I was finished with my word on DesignStudio I cut out the letters using my Cricut and Freezer paper. Freezer paper is amazing because it can be used like removable heat transfer paper. I basically cut out the letters out of the freezer paper and ironed it onto the shirt so it was a template for the paint.
I just used acrylic paint because that's what I had onhand. Plus have you ever gotten acrylic paint on your clothes? That stuff does not come out easily. And since I wasn't worried about it fading to much that's what I used. Make sure when you are painting to dab not brush. You don't want the freezer paper to get peeled up.
Let the paint dry then peel off the freezer paper carefully.
I didn't get a picture of the sewing process. But with your coordinating thread using the sewing machine (or by hand if you want) sew around the four leaf clover and stem.
And there you have a easy St. Patrick's day shirt.
Tuesday, April 12, 2011
Batman Hooded Towel
When I saw this post over at emile handmade I knew immediately that I had to make one for one of my friends that was having a baby. I made this in December so this is a old craft project that I worked on, but just found the pictures....
I followed her tutorial pretty much to the "T".
I had found the towel at Target on clearnace (score) and picked up the yellow towel at Wal-mart for farily cheap.
I think total cost for this amazing project was under $5.
So to begin go to Emile's blog and check out her tutorial.
The only thing that I didn't do was the loops for the arms to go into since I was making this towel for a baby gift. Also I used binding (I think that's what it's called) for the edges so it gave it more of a finished look to it. So to finish it off I attached the binding to the edge of the towel with pins. I cut it off at each edge and started again to give it the perfect scalloped look.
Saturday, January 8, 2011
Rag Quilt
First off pick out three or more pieces of fabric that you want to have in your blanket. I chose two different green pattern, black with a swirl in it, and a fuzzy white. You can have the back of the quilt be the same pattern by getting double of the fabric or you can do a solid color (which I did). I just went with Black as the back of the blanket. You can also choose any type of fabric. The 3 three (greens and black) were just your regular cotton. But it depends on how warm or heavy you want as to which fabric to choose.
Now for the yardage....
I'm pretty sure that I bought 1/4 of a yard of each color and for the back I bough 2 yards.
I also bought a baby quilt batting for the center of the quilt.
First thing first cut out the fabric into squares. My squares were 7 inches.
Next you need to cut the batting out. I made the mistake of cutting the squares an inch smaller... which didn't work. I then had to re-cut all of them another inch smaller. So my batting was 5 inch squares.
About this time you will also want to be laying out the blanket in the pattern that you think you will want to have the final to look like. This will give you a good idea of how many more squares to cut or if you need more or less of a fabric.
The blanket that I made was 7 squares wide and 7 squares long. Depending on who you are making the blanket for you can go bigger or smaller. Also make sure to cut out the squares for the back of you blanket.
Now the fun part. You will want to piece and sew each square together. So get a back fabric, the batting and the front fabric and make a batting sandwich. I have to pin everything, I'm just not good enough yet to sew without pins.
Then you'll sew an X in each individual square.
Once all my squares were sewn together I started sewing them into rows to form my blanket. To get the fringe on top the best that I found was to put the two back pieces together and sew on the front. I hope this picture shows what I mean:
I found it best to sew each row individually. So when I was done with this step I had 7 rows of squares. This especially helped because when I layed it out I had flipped the pattern and had two matching fabrics right next to each other. If I had sewn them together without laying them down to see a final time, I would have had to un-stitch that portion of the blanket. Glad I dodged that bullet :).
Then you'll sew the rows together the same way you sewed the squares to each other. The nice thing is it's a rag quilt and doesn't need to be perfect. The final sewing step is to sew around the edges. Again it's rag quilt so doesn't need any edges just a nice line.
Not sure what my "hem" measurement is but this is picture gives you an idea of how big I made my edges.
Now turn on a good movie, make yourself comfortable and start cutting. I didn't get a picture but just cut lines into the fabric to make that "rag" look.
And because I had extra fabric and squares I decided to make a bib for my friend using the same method. It was cute but not really sure if it's very practical. It was thick and didn't just sit flush. But it was a fun add on I guess.
And the final project again. I'm hoping to see some pictures with the baby (born Jan 7 on his due date!) so check back for more pictures.
Thursday, December 30, 2010
Christmas Stockings
Growing up we had the best stockings! My mom made them for us and they were awesome. They were a good size so we got tons of stuff in our stockings. I have wonderful memories with our Christmas stockings. Our stockings growing up were all the same color (green and white) so we didn't have our own stocking. But every year we would write our names on a piece of paper and pin it to our stocking. Christmas morning we would sneak upstairs to find all our stockings in a row on the couch filled to the brim with stuff! Christmas morning always seemed so magical to me. We always got Oranges and Apples in the bottom of our stocking along with nuts. We also got toothbrushes and a few wrapped gifts. The wrapped gifts we could open before our parents got up. Everything under the Christmas tree had to stay untouched until Mom got up. As we got older we each found olives in our stocking... yes my family was crazy about olives. Mine were always green olives because I loved them so much! And we'd also get our favorite soda in our stocking (along with all the regular goodness).
So as you can see the stockings were a major part of our Christmas. And I want our kids to have the same kind of memories. So this year I finally got around to making the kids a stocking of their own. Zack's first two Christmas's he just used a store bought stocking.
So here is how I made our stockings:
First I traced my stocking onto the fabric that I picked out for the boys (Zack's was blue and Gavin's was Green). I don't have an exact measurement though. If anyone is interested in making their own let me know and I can get measurements or a .pdf of our stocking
The best material to buy is the already quilted Christmas fabric. I didn't do that so I had to quilt my own. I also didn't buy enough fabric because I forgot that I had to quilt it so the inside of my stockings are a plain coordinating fabric. (excuse the sideways pictures, blogger keeps turing it this way... Ugh!)
After you've traced and cut out the stocking match up the the inside, stuffing and outside of the stocking. (again stupid blogger rotated the picture)
To make the quilted effect I traced line on the inside of the stocking of the quilted pattern that I wanted.
I then quilted overtop of the lines. I'm not a quilter and a beginner seamstress so I know it's not perfect but it worked for my first stockings.
Once I got both the front and the back quilted I sewed the stockings together. Make sure to leave the top open. As a little bit of decoration I wanted to line the stocking with rickrack. I've never sewn rickrack before so that was an interesting process. It took me a few tries but I think it looked okay. Next time I would definitly make use a bigger rickrack though. Basically for the rickrack I pinned it on the inside of the stocking. That way when I sewed the sides the rick rack would be lining the stocking. Rickrack was definitly a learning process for me. I still haven't mastered how to use it but I am a little bit closer. I'd do a few practice runs just so your familiar with it if you haven't used it before and your going for the same effect.
After I sewed the sides together I wanted to add a fur cuff to the top of the stocking. Again another learning experience as I have never sewn with fur before.
First I cut the fur to the desired width. for the length just make sure it's the size of the top of your stocking. What I didn't do with the first stocking but did do with second stocking that is pretty important is to sew the sides together so it makes a tube. Then pin the fur to the inside top of your stocking. The picture shows the fur the wrong way. Make sure to pin it so you see the back side of the fur or when you turn it to make the cuff you will have the wrong side. Learned that the hard way.
Once you've finished you will have a beatiful stocking that you and your family will be proud to display all season long.
The two red stockings are stocking that my mom helped me make a few years back for the husband and I. They were also my templates to make the boys stockings.
Sunday, October 31, 2010
Halloween Costumes 2010
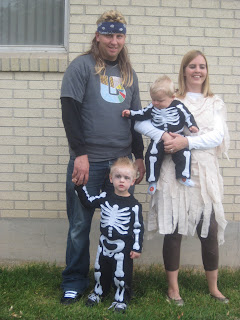
This year I decided that the boys would be skeletons and the husband and I would be mummies. Well the hubby hates dressing up so the mummy idea was tossed out of the window (for him not me). One year I had him dress up as a mummy (this was earlier in our marriage where I could make him do what I wanted... he he). That costume didn't work out too well. I just had him dress in black then I tied shredded bed sheets to him. By the time we got to the party most of the rags were falling off. Needless to say I had to find a better system. Hello Google search. I found this video on how to make a mummy costume. It seemed simple. I had to change it a little because I wanted to wear a dress instead of pants and a shirt.
(notice that I did finally win and the hubby dressed up.... Well he wore a wig)
Mummy Costume
Dress from D.I. - $6.00
Bedsheets - $Free from my mom
Tea Bags - $1.00
Total cost for my costume - $7.00!
For the boys skeleton costumes I bought black pants and black shirts. I then found a pattern for these bones, these ribs, and this pelvis. Thank you google search again. I printed them, cut them out, then folded them to fit the costume. They are obviously too big for my little guys.
The bones were made from felt and just sewed on. One challenge that I had was with my baby. He learned to crawl (well it's actually commando crawl so he just scoots on the floor). And finding a black onesie without any logo or design on was HARD. So I made my own. Thank you to the tutorial on I am Momma Hear me Roar! By doing this I was able to make my own onesie and make it look tucked in at all times.
Here is a quick look at the process of making the costumes:
Step One: Try the pants (and shirt not pictured) on your kids to see where their joints are. I marked with a pin.
Step Two: Cut out the bones for a paper pattern. I then folded them to fit their actual bone size.
Step Three: It was easiest for me to pin the paper onto the felt so I could cut them out. I folded the felt so I could cut out two at a time. Made it much easier!
Step Five: I then un-hemmed the inseam of the pants so I could easily sew the bones on. (Front and back). Not pictured is sewing the inseam back up. I don't have a surger so I just used a straight stitch to do it. It was easy and no one is going to look on the inside of the clothing to see what the seam looks like. At least I hope they don't.
Step Six: Repeat steps with shirt. I un-hemmed the arms to make it easier to sew.
For the onesie you will need to figure out how long you want the onesies to be. I did this by trying the shirt and pants on my son. Figuring where I wanted it to be tucked in, then laying out one of his onesies that currently fit him and figuring out the length. (Check out the Hear Me Roar link and you'll get a great explanation)
Then I cut the onesie off. I don't have the picture of me actually sewing the shirt and the onesie together. You just need to pin the bottom on the onesie to the shirt and sew them together. (again check out the link and you'll see exactly what I mean). Seriously if I can do it you can, it was so easy!
Some things I learned:
- There is a reason that I couldn't find any tutorials on how to sew a skeleton costume. It's hard! Thankfully I had watched the above mentioned mummy tutorial video and got the brilliant idea to un-hem the inner legs and the arms so I could sew the bones on.
- Make sure to put the clothes on your kids first so you can figure out where their normal bones would be (joints in elbows and knees). Thankfully I had read that tip somewhere and knew to do this. Otherwise my bones would have bent in the weird places. I think this is what bugged me so much about store bought costumes.
- Putting bones on the front and back is hard work but so worth it. My oldest loved it. He would go look in the mirror and turn around so he could see the back too... so cute!
- Next time DON'T SEW THE BONES, just paint them on... LOL.
Felt for bones - Less then $3.00
Onesie - $Free it was just an old one we had
So total cost roughly $15 for two costumes give or take a dollar or two. Not bad!
And the end result..... Absolutely adorable if I do say so myself
The fronts:
One thing that I'm most proud of about of the costumes. They were mostly my design (with some help on the bone patterns).