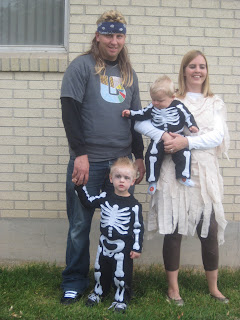
This year I decided that the boys would be skeletons and the husband and I would be mummies. Well the hubby hates dressing up so the mummy idea was tossed out of the window (for him not me). One year I had him dress up as a mummy (this was earlier in our marriage where I could make him do what I wanted... he he). That costume didn't work out too well. I just had him dress in black then I tied shredded bed sheets to him. By the time we got to the party most of the rags were falling off. Needless to say I had to find a better system. Hello Google search. I found this video on how to make a mummy costume. It seemed simple. I had to change it a little because I wanted to wear a dress instead of pants and a shirt.
(notice that I did finally win and the hubby dressed up.... Well he wore a wig)
 Mummy Costume
Dress from D.I. - $6.00
Bedsheets - $Free from my mom
Tea Bags - $1.00
Total cost for my costume - $7.00!
For the boys skeleton costumes I bought black pants and black shirts. I then found a pattern for these bones, these ribs, and this pelvis. Thank you google search again. I printed them, cut them out, then folded them to fit the costume. They are obviously too big for my little guys.
The bones were made from felt and just sewed on. One challenge that I had was with my baby. He learned to crawl (well it's actually commando crawl so he just scoots on the floor). And finding a black onesie without any logo or design on was HARD. So I made my own. Thank you to the tutorial on I am Momma Hear me Roar! By doing this I was able to make my own onesie and make it look tucked in at all times.
Here is a quick look at the process of making the costumes:
Step One: Try the pants (and shirt not pictured) on your kids to see where their joints are. I marked with a pin.
Step Two: Cut out the bones for a paper pattern. I then folded them to fit their actual bone size.

Step Three: It was easiest for me to pin the paper onto the felt so I could cut them out. I folded the felt so I could cut out two at a time. Made it much easier!

 Step Five: I then un-hemmed the inseam of the pants so I could easily sew the bones on. (Front and back). Not pictured is sewing the inseam back up. I don't have a surger so I just used a straight stitch to do it. It was easy and no one is going to look on the inside of the clothing to see what the seam looks like. At least I hope they don't.
 Step Six: Repeat steps with shirt. I un-hemmed the arms to make it easier to sew.
For the onesie you will need to figure out how long you want the onesies to be. I did this by trying the shirt and pants on my son. Figuring where I wanted it to be tucked in, then laying out one of his onesies that currently fit him and figuring out the length. (Check out the Hear Me Roar link and you'll get a great explanation)
Then I cut the onesie off. I don't have the picture of me actually sewing the shirt and the onesie together. You just need to pin the bottom on the onesie to the shirt and sew them together. (again check out the link and you'll see exactly what I mean). Seriously if I can do it you can, it was so easy!

Some things I learned:
- There is a reason that I couldn't find any tutorials on how to sew a skeleton costume. It's hard! Thankfully I had watched the above mentioned mummy tutorial video and got the brilliant idea to un-hem the inner legs and the arms so I could sew the bones on.
- Make sure to put the clothes on your kids first so you can figure out where their normal bones would be (joints in elbows and knees). Thankfully I had read that tip somewhere and knew to do this. Otherwise my bones would have bent in the weird places. I think this is what bugged me so much about store bought costumes.
- Putting bones on the front and back is hard work but so worth it. My oldest loved it. He would go look in the mirror and turn around so he could see the back too... so cute!
- Next time DON'T SEW THE BONES, just paint them on... LOL.
Felt for bones - Less then $3.00
Onesie - $Free it was just an old one we had
So total cost roughly $15 for two costumes give or take a dollar or two. Not bad!
And the end result..... Absolutely adorable if I do say so myself
The fronts:

 One thing that I'm most proud of about of the costumes. They were mostly my design (with some help on the bone patterns).