Wednesday, October 5, 2011

Halloween Jars

Sorry for the lack of posting.  Don't worry this isn't the only blog that I've managed to neglect.  Our family blog is lucky to get one post per month.  Being a working mommy that also is trying to find time to craft and redecorate is harder then it looks. 

I found some Halloween jars on Pinterest and knew immediately that I needed to make them.  So I pinned them to my board hoping to find some time to make them.  After reading a few blogs on  how to make them I realized I had all the necessary material (except Orange... really who has orange tissue paper) to make these jars.  Plus the hubby wanted to get rid of the bottles I had from a few Christmas's ago that I used for Neighbor gifts.  So this was a perfect opportunity to make some new decorations and get rid of something in a creative way.

Before I begin I just want to make sure credit is given where credit is due. 
This is the link to the Monstor Jars that I pretty much copied.  Not So Idle Hands Monster Jars
And here is a link to the tutorial on how to make them.  Not So Idle Hands Pumpkin Jar Tutorial

I don't have a tutorial because I wanted you to go to Not So Idle Hand's website to check it out.  Plus here instructions were perfect so why mess with perfection. 

Here are my jars.  I didn't have different size jars so I just worked with what I had.  Plus it doesn't look too bad that they are all the same size.
The lights were already on the ledge where the Monsters were so I just used them. I may switch them to the white lights but we'll see.

Wednesday, June 8, 2011

Newest Addiction

I am loving Pinterest.com.  If you haven't heard about it or looked into it DO.IT!  It's such a great website. 

I started seeing posts from other craft sites that I visit about their pinterest account and where they can be found.  So finally I looked into it.  It was a little overwhelming and confusing at first but once I finally got on I was hooked. 

To get onto Pinterest you have to be invited by someone.  So if your interested let me know and I will invite you.  On their website you can ask to be invited but you basically get put on a waiting list and I hate waiting lists.  So I went to their facebook page and left a comment asking to be invited by someone.  Within minutes I had an invite... YEAH!  And my newest addiction was started. 

The reason I love pinterest is because a few months ago I had a wonderful collection of crafts to try bookmarked in my favorites on my computer.  Then my computer crashed, everything was lost.  Luckily I back up all my pictures and important documents but not my favorite... :(   I was really sad to have lost so much inspiration... and work.  By using Pinterest to basically bookmark all my favorite websites and links I don't have to worry about lossing anything!  Plus anytime someone I follow puts a pin on a link or website I can see it.  I've found so many cute ideas and I don't have to do all the work looking for it.  It's WONDERFUL. 

So thank you pinterest for making crafting and linking so much easier!

My pinterest site is http://pinterest.com/jennifersp/ Hopefully this links works and takes you to my board. 

And some examples of what I have pinned to my boards:

Holdiay Craft ideas


For the Home


Clothing and accessories.

Sunday, May 29, 2011

I have a room and I need the time

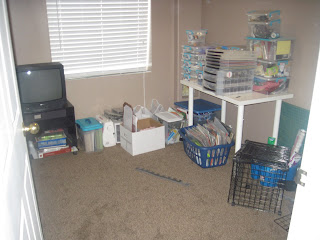
I finally have my very own craft room.  Before I had a corner in our computer room and most of my stuff was "organized" in the closet.  It's so nice to have my own space because since it's not such a public area I'm able to have my creative mess.

And yes it is a creative mess. I know where 90% of my stuff is located and I work better when I am able to spread out. This is also a space where hopefully the kids will stay out of. I have a child proof ball thing on my door so far it's kept the little ones out.  Woe be the day they learn how to get in, then we'll have to invest in a lock.

Here is a before
 
(Such a mess! Which is why moving to the basement was needed so badly)

Moving day


And a after of what my space looks like.  

The walk in closet.  With a built in cabinet perfect for 12x12 items! 

The space isn't 100% finished.  The electrical has to be worked on which is why there is ugly extension cord running through the room and I want to add fun things to the walls. Pictures, Saying, shelves for magazines and fun stuff like that. But's it's a work in progress and things cost money.

Crafts in Progress
I thought it would be fun to show a "few" projects that I'm working on. I'm netorious for starting things and not finishing them.  So I'm setting a goal with myself to work on all my unfinished projects throughout the month of may.  That includes all holiday stuff that I wanted to get out but never finished.


Above is a picture of my "project" boxes.   A lot of random items that are just getting stored away. 

Below is all of my projects pulled out of the box and organized a little bit.  I'm really excited to start my new goal this coming month.  And the upside of it, I won't have to spend any money because I already have EVERYTHING that I need!


Here are the unfinished projects I will be working on
"A Crafting Bucket List" if you may.

Photobucket
1. DI Find - Upcycle into something cool.  Maybe a chalkboard for the toy room.  Still undecided.
2. Zack and Gavin's names for their rooms. I started this project last summer. 
3.  Wooden Easter Bunny from 2 years ago I think.
4. Ribbon Board.  I just never got around to doing the criss cross ribbons. 
5.  I Spy Bags. This is from the last Craft Extravagansa that my ward had, so hopefull it gets finished within the same year.
6.  I just realized this is actually two projects and I may be missing on piece.  One is a block of wood that had the 4 season's on each side.  The second is a welcome sign that has wooden things dangling for each season.
7.  All I have to do is mend this poor snake for Zack.  Grandma bought it for him and I started noticing the entire side coming ustitched; so I had to put him away.
8.  Witches Boot - Halloween project
9. Fabric for Pumpkins
10. Wooden Turkey.  I've had this guy for well over 3 years.  About time he got finished!
11. Fabric for a skirt I want to make.  This is actually round 2 of a skirt I've tried making before.  Let's hope this one turns out better then the first.
12. Beanie/Hats for the boys.  Found on a website to upcycle old sweaters.  I found a sweater at DI to practice on. 
13.  Pillows for the Playroom couch.
14. The sheets are fabric for a comforter I want to make and the foam and gray fabric are for a backboard. 

Tuesday, May 17, 2011

Updating Ugly Sign


I've seen a lot of upcycling on the web. I'm not quite to that point in my crafting yet. Not that I don't like it, I just don't have the vision yet. So to start small I updated a Happy Easter Sign that I had recieved probably as a Bunko prize.

When I put the sign on my mantel the colors were so blah that you hardly noticed the sign.

So to fix that; I went from BLAH

To Wow

What I did:
Painted the letters all white (front, back and side). This took a few coats.
Painted the fron the colors that I wanted
Inked the edges to make it pop (can't really tell in the pictures)
And eventually I'll add some ribbon to make it cutsey.

For letting me paint my letters Zack got to paint his gun.

Monday, May 16, 2011

Bib Apron


This was one of the easiest projects I've worked on in a while.  And I loved the outcome! 

I found the post about the "Bapron" on U-create. If you still haven't been to their website then you need to go... right now..! That site is a wealth of knowledge and different skill level.

Here is the actual tutorial on how to make the bib aprons. I made the aprons for a fundraiser for our Young Women so they could raise money for Girl's camp. I'm not sure what the they actual went for, but any donations totally helped that night.

I made mine so they could be a set.


A set for a boy,


and a set for a girl.  I'll admit when I showed my husband the first one I made and it was a girl's color I saw fear in his eyes.  I think he thought I was going to announce something to him.  Luckily for him I just like making girly stuff and wanted to make the girl bibs first.

If you've taken a look a the tutorial welcome back :).  I pretty much followed her instructions and pattern to a "T".  I made my bias tape to be the 1.5" size.  It was perfect and so so easy.  And I am 100% a fan of making bias tape now.  I love that you can make it to match whatever you are working on.  Goodbye buying bias tape! 

Here is a view of the back of the bapron. 

And if you think that the Bapron is only for babies you're wrong.  Zack had to try on one of the baprons too.  So here is a picture of my 3 year old and my 1 year old sporting the bapron.  Such good models.  Oh and trying to get them both to look at the camera... impossible!

Saturday, April 23, 2011

Project Easter Skirt - Fail

As the title says I tried to make myself an Easter skirt and failed miserably.  I found the cutest skirt here.  The Tutorial was pretty straight forward and it looked really easy to make.  I followed her guidelines on making the skirt a different size (Sadly I'm a little bit bigger then she is -- height and waist).  Not sure how I messed up but after I got 2 of the ruffles on I realized that I had cut my skirt in on the width and not the length.  So my skirt is now short and big around instead of the other way around. 

Basically I just wasted $19.00 in material.  Grrr!  It's not salvageable because not all the measurements are off. 

Also I am having a huge issue with my sewing machine sewing ZigZag Stiches.  You can see from this picture what it's doing.  To get around this I just used a straight stitch when I sewed the ruffle to the skirt. 


The most frustating part of it all is I thought it was going to be easy to work on so I started this first instead of working on the boys ties and now it's the day before Easter and I don't have an Easter skirt and the boys don't have Easter ties.

I'm frustrated with myself and lack of sewing ability. I keep thinking it's a learned process but I honest think some people are just born with the ability to creat thing with a sewing machine (like my mom) and I just don't.

Monday, April 18, 2011

Easter Peep Bunnies

I have always been fan of the Easter candy Peeps.  I love when the package has been opened and they get just a little bit hard and a little bit stale. 
Well this next craft isn't hard or stale... LOL.

Check out the blog Dandelions and Lace for this next tutorial.  I'm not even going to show how I made them (other then a few tips) because her explanation and pictures are amazing! 

The first difference in my Peeps and hers is that I enlarged her pattern.  The reason I did this was because
a) I'm just a beginner and I don't think I could have sewn around the ears as well as she did... It was still tricky.
b) I wanted to use my peeps as decorations where hers were small enough to put in a Easter Basket.

Here are my Easter Peeps:


And now my tips.

If the back of the fleece isn't noticeable like 2 of my fabric's were make sure to mark them somehow so you know which way is the front and which is the back.  The pattern looks symmetrical but it's not.  I had this problem with the first one that I made.  I had the second piece all pinned to complete the back and none of the corners or ears matched up.  It would have made for a silly looking bunny.


When pinning together the back of the bunny.  If found it easier to match key corners (top of each ear, anywhere there was to be an indent).  It took away any guess work that I had to do. 


Use a ton of pins!  It helps keep it all together and makes sure the fabric won't bunch up or stretch the wrong direction.


Have fun  with the colors and where you display the bunnies.  My son loves getting up in the morning and seeing where the bunnies have moved to that day.  The funniest thing he said one morning while eating breakfast and saw that two of the bunnies were on a ledge we have in our living room "Oh my crap mom, what are they doing up there?!"  He's only two so it was pretty funny because I don't know where he learned "Oh my crap" from. 


Remember to visit Dandelions and Lace. She also has a pattern for Peep Chicks.  So cute, but I'll stick to the Peep Bunnies this year.  If you do make a bunny please post either a link in the comment section or email me to let me know.  It's fun to see what others are making.