Thursday, December 30, 2010

Christmas Stockings

December has definitely slowed me down with getting ready for Christmas, working and trying to get neighbor gifts made and delivered. So if your checking in make sure to check the next few posts because even though I haven't been posting I have been crafting!

Growing up we had the best stockings! My mom made them for us and they were awesome. They were a good size so we got tons of stuff in our stockings. I have wonderful memories with our Christmas stockings. Our stockings growing up were all the same color (green and white) so we didn't have our own stocking. But every year we would write our names on a piece of paper and pin it to our stocking. Christmas morning we would sneak upstairs to find all our stockings in a row on the couch filled to the brim with stuff! Christmas morning always seemed so magical to me. We always got Oranges and Apples in the bottom of our stocking along with nuts. We also got toothbrushes and a few wrapped gifts. The wrapped gifts we could open before our parents got up. Everything under the Christmas tree had to stay untouched until Mom got up. As we got older we each found olives in our stocking... yes my family was crazy about olives. Mine were always green olives because I loved them so much! And we'd also get our favorite soda in our stocking (along with all the regular goodness).

So as you can see the stockings were a major part of our Christmas. And I want our kids to have the same kind of memories. So this year I finally got around to making the kids a stocking of their own. Zack's first two Christmas's he just used a store bought stocking.


So here is how I made our stockings:

First I traced my stocking onto the fabric that I picked out for the boys (Zack's was blue and Gavin's was Green). I don't have an exact measurement though. If anyone is interested in making their own let me know and I can get measurements or a .pdf of our stocking

The best material to buy is the already quilted Christmas fabric. I didn't do that so I had to quilt my own. I also didn't buy enough fabric because I forgot that I had to quilt it so the inside of my stockings are a plain coordinating fabric. (excuse the sideways pictures, blogger keeps turing it this way... Ugh!)


After you've traced and cut out the stocking match up the the inside, stuffing and outside of the stocking. (again stupid blogger rotated the picture)


To make the quilted effect I traced line on the inside of the stocking of the quilted pattern that I wanted.


I then quilted overtop of the lines. I'm not a quilter and a beginner seamstress so I know it's not perfect but it worked for my first stockings.


Once I got both the front and the back quilted I sewed the stockings together. Make sure to leave the top open. As a little bit of decoration I wanted to line the stocking with rickrack. I've never sewn rickrack before so that was an interesting process. It took me a few tries but I think it looked okay. Next time I would definitly make use a bigger rickrack though. Basically for the rickrack I pinned it on the inside of the stocking. That way when I sewed the sides the rick rack would be lining the stocking. Rickrack was definitly a learning process for me. I still haven't mastered how to use it but I am a little bit closer. I'd do a few practice runs just so your familiar with it if you haven't used it before and your going for the same effect.


After I sewed the sides together I wanted to add a fur cuff to the top of the stocking. Again another learning experience as I have never sewn with fur before.

First I cut the fur to the desired width. for the length just make sure it's the size of the top of your stocking. What I didn't do with the first stocking but did do with second stocking that is pretty important is to sew the sides together so it makes a tube. Then pin the fur to the inside top of your stocking. The picture shows the fur the wrong way. Make sure to pin it so you see the back side of the fur or when you turn it to make the cuff you will have the wrong side. Learned that the hard way.


Once you've finished you will have a beatiful stocking that you and your family will be proud to display all season long.


The two red stockings are stocking that my mom helped me make a few years back for the husband and I. They were also my templates to make the boys stockings.

Wednesday, December 8, 2010

2x4 Snowman

I am addicted to 2x4 projects. Once I saw this tutorial on Crafty Chic Mommy's blog I just knew I had to make one (or two). I also have a very a patient husband that will cut my wood for me (I just can't get over my fear of the saw).

I made this snowman as a baby shower prize. But I couldn't just stop with one I also made one for my Sister-in-Law for her birthday.


How I made the 2x4 snowman:
3 2x4 cut to size you want the snow man.
  • I used 8" for bottom, 6" for middle and 4" for head

White Paint
Brown Paint
Burnt Orange Paint (for the nose)
2 Buttons
2 Stars (one for the star with words on it, and one for the nose)
Fabric for Scarf

First you need to sand the edges of the 2x4 so they are smooth and a little bit rounded

Next paint all the blocks white


Once the paint is dry water down the brown paint and apply it like a stain. I liked the kind of dingy look. The white was just too white. Apply the brown paint then immediatly wipe the paint off.


Once the blocks are dry glue them together. I use Gorilla Glue and LOVE it! It drys pretty quickly (completly dry in 5 hours) and you don't need to use a lot of it. And it's tough glue!


Once the glue on the blocks are set you can begin decorating your snowman.

I don't have a saw or anything I could cut a wooden nose out of so what I did was I bought two stars. The one I used for the bottom of the snowman and the second I used for his nose. I used my husbands pipe cutter (I think that's what they are) and started cutting. It worked out perfectly because it already had a rounded corner. To make the lines in the nose I just used one of our old kitchen knives and cut lines. Then I used our potato peeler to make them deeper. Quality I know, but I had to use what I had on hand.

The star that I used for the nose


Beginning cutting


After all the cuts. Don't forget to sand the edges. This will help get ride of any rough edges from the scissors.


Once you've gotten your nose the way you like it paint it orange. Don't worry if the paint doesn't get in ithe lines that you cut because you'll be putting the brown paint (stain) overtop and the lines will be filled in.

Finally after decorating your snowman you will have a wonderful 2x4 creation!

Sunday, November 14, 2010

2x4 pumpkin and Christmas Tree

If you haven't been to http://www.u-createcrafts.com/ then you are seriously missing out on a wonderful website. I visit this website daily. Not only does she feature some amazing projects but she also has guest posts with tutorials. Once I saw this project I just knew I had to make one. They are so easy and inexpensive.

The 2x4 pumpkin is from Under my Umbrella. Here is a link to her tutorial on u-createcrafts. Like I said AMAZING website.

I pretty much followed her tutorial.

Here is my finished project


At the bottom of the post there are other projects that Under My Umbrella created. I couldn't resist trying the Christmas Tree.

So here is the finished Christmas Tree


I made these wood projects for Birthday gifts. The recipents lived together and we celebrated their birthday the same day so I had to make one the Pumpkin and one the Christmas Tree.

Sunday, October 31, 2010

Halloween Costumes 2010

One memory I have as a child is that my mom would make our costumes. I loved my costumes. Last year was the first time I've tried to make costumes for my. Last year we were the Rubbles (from the Flintstones). I had a lot of fun making the costumes and they were pretty easy.

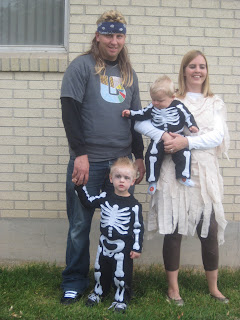
This year I decided that the boys would be skeletons and the husband and I would be mummies. Well the hubby hates dressing up so the mummy idea was tossed out of the window (for him not me). One year I had him dress up as a mummy (this was earlier in our marriage where I could make him do what I wanted... he he). That costume didn't work out too well. I just had him dress in black then I tied shredded bed sheets to him. By the time we got to the party most of the rags were falling off. Needless to say I had to find a better system. Hello Google search. I found this video on how to make a mummy costume. It seemed simple. I had to change it a little because I wanted to wear a dress instead of pants and a shirt.

(notice that I did finally win and the hubby dressed up.... Well he wore a wig)


Mummy Costume
Dress from D.I. - $6.00
Bedsheets - $Free from my mom
Tea Bags - $1.00
Total cost for my costume - $7.00!

For the boys skeleton costumes I bought black pants and black shirts. I then found a pattern for these bones, these ribs, and this pelvis. Thank you google search again. I printed them, cut them out, then folded them to fit the costume. They are obviously too big for my little guys.
The bones were made from felt and just sewed on. One challenge that I had was with my baby. He learned to crawl (well it's actually commando crawl so he just scoots on the floor). And finding a black onesie without any logo or design on was HARD. So I made my own. Thank you to the tutorial on I am Momma Hear me Roar! By doing this I was able to make my own onesie and make it look tucked in at all times.

Here is a quick look at the process of making the costumes:

Step One: Try the pants (and shirt not pictured) on your kids to see where their joints are. I marked with a pin.

Step Two: Cut out the bones for a paper pattern. I then folded them to fit their actual bone size.


Step Three: It was easiest for me to pin the paper onto the felt so I could cut them out. I folded the felt so I could cut out two at a time. Made it much easier!


Step Four: I sewed the front and back of the pelvis on.


Step Five: I then un-hemmed the inseam of the pants so I could easily sew the bones on. (Front and back). Not pictured is sewing the inseam back up. I don't have a surger so I just used a straight stitch to do it. It was easy and no one is going to look on the inside of the clothing to see what the seam looks like. At least I hope they don't.


Step Six: Repeat steps with shirt. I un-hemmed the arms to make it easier to sew.

For the onesie you will need to figure out how long you want the onesies to be. I did this by trying the shirt and pants on my son. Figuring where I wanted it to be tucked in, then laying out one of his onesies that currently fit him and figuring out the length. (Check out the Hear Me Roar link and you'll get a great explanation)


Then I cut the onesie off. I don't have the picture of me actually sewing the shirt and the onesie together. You just need to pin the bottom on the onesie to the shirt and sew them together. (again check out the link and you'll see exactly what I mean). Seriously if I can do it you can, it was so easy!


Some things I learned:

  • There is a reason that I couldn't find any tutorials on how to sew a skeleton costume. It's hard! Thankfully I had watched the above mentioned mummy tutorial video and got the brilliant idea to un-hem the inner legs and the arms so I could sew the bones on.
  • Make sure to put the clothes on your kids first so you can figure out where their normal bones would be (joints in elbows and knees). Thankfully I had read that tip somewhere and knew to do this. Otherwise my bones would have bent in the weird places. I think this is what bugged me so much about store bought costumes.
  • Putting bones on the front and back is hard work but so worth it. My oldest loved it. He would go look in the mirror and turn around so he could see the back too... so cute!
  • Next time DON'T SEW THE BONES, just paint them on... LOL.
Pants and shirt for the boys -roughly $12
Felt for bones - Less then $3.00
Onesie - $Free it was just an old one we had
So total cost roughly $15 for two costumes give or take a dollar or two. Not bad!

And the end result..... Absolutely adorable if I do say so myself

The fronts:

And the backs:One thing that I'm most proud of about of the costumes. They were mostly my design (with some help on the bone patterns).

Sunday, October 24, 2010

Mummy Cookie suckers

I love watching Good Things Utah. I listen to the girls talk the first segment of the show then I fast forward to either the craft segment (if there is one) or the cooking segment. I know I'm bad, but with 2 little boys I have very limited time to watch TV. A few weeks ago I saw these cookies decorated on GTU. I loved them. I wanted to do them for a neighborhood gift but as I mentioned limited time because of two little boys I got them made but never got them out to neighbors. Well actually I did finally give them to a neighbor as a thank you for watching my kids last minute so I could go to work. I think they turned out pretty good.


Things needed to make this project:
  • Double Stuffed Oreo's
  • Sucker sticks
  • Melting chocolate
  • Something for the eyes (I used M&M's -- which were kind of big but effective)

What to do:

  • Take oreo's apart without breaking the frosting apart. Dip the sucker sticks in melted chocolate before putting inbetween the cookies. This will help make the sticks stay and not slid up or down.
  • Put in freezer for a little bit to let the chocolate set up
  • Next Dip the oreo pops in melted chocolate. Lay on Parchment paper. Place eyes in the chocolate immediately. Freeze until chocolate is set.
  • I don't have cake decorating tools so I put melted chocolate in a plastic baggie and cut off one of the corners of the bag. Press the chocolate out in strips to make the bandages for the mummy's. Makes sure to cover the top and the bottom of the eyes. And don't worry it doesn't have to be perfect, it's suppose to look like bandages.
  • Place in freezer for a few minutes so the chocolate can harden.
  • Eat or give to a neighbor.
Things I learned:
  • Don't spread out the chocolate decorating over a entire week
  • Put the eyes on after you dip the oreo's in the chocolate. I did it after they had hardened and it worked out okay but because I froze and thawed them so many times the chocolate started to fade.
  • Give to neighbors because they are ADORABLE!

Monday, October 18, 2010

Monster Cupcakes

Anyone that knows me well knows that I love cupcakes. There is just something magical about minature cakes. I love how easy they are to create. If I would have known better I wouldn't have gone into Interior Design but gone into some type of baking degree. I love watching the cake shows (Ace of Cakes, Cake Boss, Ultimate Cake Challenge and of course cupcake wars).

For a little get together with my friends and their kids I made these:


Aren't they adorable. I was inspired by a segment on Good Things Utah. I think my favorite is the Mummy and the Spider. I couldn't find the Black Licroice strings so my spider has red legs. That's the power of creativity!

They were super easy to make

Step 1: Bake your favorite cupcake recipe. I go easy and pick up a box. I hate chocolate so I usually get something buttery... mmm butter.

Step 2. Decide what monsters you want to make. In my case I decided to make Frankenstein, a Pumpkin, Witch, Spider and Mummy.

Step 3: Mix food coloring with sections of your frosting. I used white, Green and Orange.

Step 4: Have fun decorating. This would also be a great project for kids. My two year old isn't one to help with this kind of stuff yet but we are working on that.

For Frankenstein: I used Black Gumdrops for the bolts (flavor was Blood orange... mmm), and marshmellows for the mouth. I used black frosting for the hair and eyes

For Pumpkin: I used Black Gumdrops for the eyes, Candycorn for the nose and black frosting for the mouth. Green frosting for the stem.

For the Witch I used graham crackers cut into a witches hat then frosted with black frosting, Candy corn for the nose and black frosting for the hair, eyes and mouth.

For the spider I frosted white, then made a spiral circle with the black frosting. I then pulled a toothpick from the center to the edges to create a Spiderweb effect. The spider is made from Black gumdrop and black frosting. The legs are pull apart licorice.

The Mummy is my favorite: he is made by frosting the cupcake white. Then placing Junior mints for eyes. I then put frosting into a bag and made it look like bandages. So fun and SO easy.

I hope this inspires you to be creative this halloween. The food a fun part of the season too.

Sunday, September 26, 2010

Cricut Vinyl Letters

I love the vinyl letters and all the wonderful saying that are out there. I love that they are getting so common place that Target and Walmart are starting to sell them. The only thing is I'm cheap. There I said it.

I bought the cricut brand vinyl at Robert's, used their 40% coupon and got a roll for only $5. I made a sign for my little sister. And the remaining vinyl I made this...


The Cricut Cartridges that I used are:

Opposities Attract
Cuttin' Up
Storybook

The other frame is waiting for my youngest's picture which I haven't gotten taken yet... ugh!

The frames I got during the 50% sale at Roberts so they only cost me about $12 a piece. So all together this project costed me roughly $26.

Friday, September 24, 2010

Satin Sunflowers

I found this tutorial on how to make sunflowers out of Satin and Organza (I oringially found it on this website). I couldn't wait to give it a try. But I don't have a little girl to dress up and I really don't wear flowers in my hair or on my clothes so I needed to find a fun excuse to make these.


I'm a teacher for the Mia Maids and Laurels during Church on Sundays and I LOVE making handouts. I found this idea for a handout but instead of using the house I wanted to use the sunflowers. It was perfect especially with all the growing sunflowers in our area and the changing seasons. I think it worked perfect. I added a clip to the flower and the girls can use them for hair pieces, on their clothes or attach it to a bag.

I followed the tutorial pretty much step by step as this was my first time ever making flowers. I didn't want to mess them up. But now that I know how to do it I can make them any color that I want and definitly personalize them.

I'm also not a professional photographer so hopefully you'll get the gist of how to make these as well.

First I cut the satin and organza into squares. You pick the size, it's up to you.
I cut them did 4x4 and 3x3.


Next cute the squares into circles. It's okay if it's not perfect as you can tell mine aren't.

Then cut lines into the circle. Again it doesn't need to be perfect.

Then the fun part. Burn it. This took me some trial and error and a few got singed more then I wanted them too. But that's what makes them fun, they look great with the singed edges. I did learn to make sure to have the satiny side facing the fire. Or you'll get the curl going the wrong way. The Organza curls quickly so don't get it too close to the fire.

To make the middle part I just used a cute ribbon. I rolled ribbon so mostly what you'd see was the dots. Then I glued it into a circle swirling as I go. Again this was all done by trial and error. Some look better then others.

I glued some felt to the barrette or whatever you'd call this. Then I glued the felt to the flower to make it more sturdy.
Tada you have a beautiful flower. And I got a ton of compliments from it. But don't forget to check out the LINK to see the original creaters of this wonderful flower.